Pages

Friday, 31 January 2014

Dryathlon


For January 2014, I kickstarted the year by ditching the drink in aid of Cancer Research UK. Just before Christmas a family member of mine was diagnosed with Cancer, but thankfully it was caught early and has since been operated on. My family was very lucky but others are not. I decided to raise money for the charity, by taking part in the dryathlon event Cancer Research set up. My birthday was this month so celebrated it sober even though I was surrounded by tempting champagne and cocktails! I am by no means an alcoholic, but I did find it a struggle, particularly when going out to the pub with friends, or going out for dinner.

I have now finished my dryathlon though, and will be celebrating my birthday this weekend and will no doubt have the hangover from hell on Sunday. I managed to reach my target of £150 but would still love any donations big or small. A lot of my friends and family have donated but I thought I could use my blog to my advantage as it reaches such a huge audience now a days. 

I would hugely appreciate any donations, and although some people who read my blog may not personally know me, Cancer affects 1 in 3 people which is such a scary statistic. By donating to my cause you could help someone in the future that you may know. I never thought Cancer would affect my family, but sadly it did. It is not a disease to underestimate! The link to my just giving page is in the link below, and is a safe and secure way to donate, I do not pocket any of the money I swear!


Please help me put money towards a cure for Cancer! Thank you for reading! I know this is not my usual kind of blog post, but I have done some Cancer Research UK inspired nail art to make it relevant :)


Day 31: Silver

  Were finished! The Nail Art Jan Challenge is finished! I will miss doing it so much! It has been so much fun coming up with ideas for each day and the prompts have made me explore so many different nail art ideas. 


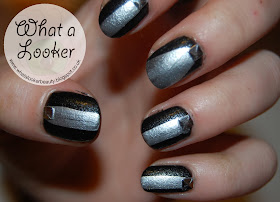
So the last prompt is 'Silver'. I must admit that the idea for this nail art was not my own, it was in fact my boyfriends. He suggested doing metal floor patterns, the type that you see in warehouses or more industrial places. This look was much harder than I anticipated and after playing around with lots of patterns I found the pattern that was most effective was this sort of cross hatch design. 


I think it looks quite 3D on the nail which is not what I was expecting. I must also add that these are not my nails. My sister has stepped in as my nail model because having polish on my nails solidly for the last month has left them a little worse for wear and I think they need a little break.

Please suggest any nail art you would like to see! I love getting fresh ideas

Tuesday, 28 January 2014

Day 28: Re-Creation


 Today is the penultimate post to my 'Nail Art January Challenge'. Todays prompt is 'Re-creation' and I have been looking forward to this one, (I swear I have said this for every prompt) as re creating some older designs of mine has been something I have wanted to do for a while. It is really true what they say, practice really does make perfect, (and by no means am I saying I am perfect), I still have a long way to go and think you never do stop learning, but I personally think I have grown a lot in terms of skill and imagination in the last couple of years I have been doing nail art. Nails that I was so proud off before, make me cringe now looking back at how sloppy or messy they are.


 These tuxuedo nails are ones that particularly make me do this! I did them for a friends birthday party a couple of years ago and I thought they were so quirky and cool and I was really happy with myself. I originally used cocktail sticks for this design but I used nail art pens this time round for more precision. 


I do still think they are a really simple and cute design, but I think my 'now' version has a bit more detail and interest. I am still not 100% happy with them, and want them to be sharper, and now I wish I had done the bow ties the cuticle end of my nail like I did before, but hey, you learn from your mistakes. I saw this design on Wah Nails and have added the little collars like they did. 


A group of my favourite nail art bloggers The Nailasaurus, Chalkboard Nails, Work/Play/Polish and Rebecca Likes Nails started a thing called 'Lacquer Legion' which is basically a monthly nail art challenge, as you can imagine doing nails every 3 days can be a bit testing. The first day of the lacquer legion started yesterday, and luckily enough the prompt for that was 'reinvention', so it all tied in rather nicely for me! Make sure you look out for my 'Lacquer Legion' posts in the future, its a really cool idea I'm excited about. This post will be the first of many posts where I recreate a nail art look I did in the past. So keep your eyes peeled for that too!

Monday, 27 January 2014

Day 22: Studs

We are nearing the end of the month and therefore the end of my nail art challenge. Todays prompt is 'studs'. I was slightly apprehensive about this prompt as I am very inexperienced at using studs in nail art. Although there is a prompt later on in the challenge is 're-creation' I have kind of done another recreation in this post. 

I did a similar nail art design around this time last year, when I got my Nails Inc leather effect polish for Christmas. As you can tell, I was VERY new at studs at this point, as the studs are all wonky and not very neat at all. The pictures I used on my blog back in the day were also horrendous quality, and I don't think this picture gave the leather effect the justice it deserves.


I have used exactly the same materials in this post as I did back then so check the full post here!

I have done two variations on these studded nails as I couldn't decide on which stud to use. My sqaure silver studs or my round gold ones. Originally I thought the silver ones would be best but I thought the would be a bit boring by themselves. I drew on some silver lines and triangles to add a bit of interest but feel the silver stud got a bit lost in the design! You can see however that you can paint on top of the leather effect polish and get a cool effect. 


 The other stud design I did is a bit simpler, but I think I actually prefer it. The gold studs really pop against the black leather polish, and it has an understated look that I like.


Keep watching for the last few posts of my nail art challenge!


Sunday, 26 January 2014

Day 25: OOTD


Hello everyone! Today's nail art post is meant to be from yesterday. I have been really busy this weekend with my little sisters birthday party and my own birthday celebrations. For my birthday, my lovely group of friends bought me a new outfit, which is very fitting for the prompt OOTD (outfit of the day). My friends have clearly noticed my obsession with tartan at the moment, as they bought me some tartan leggings from Topshop. Once again I am attempting the tartan pattern and once again I don't think I have quite nailed it! I really really want to master this look so I will keep persevering. This is the square I have tried to mimic.


I used 'matte white' from Barry M and used my blue and hot pink nail art pens from model's own. I should have used red but I was a bit pressed for time with this nail design, so I used what I had to hand. There is not as much detail as I would like in this nail art either.

I have only two more posts now for Nail Art Jan make sure you keep posted!

Sunday, 19 January 2014

Day 19: Sweets

Hello there! Today is day 19 of the Nail art Challenge. I'm just over half way now! Today's prompt was sweets, and it instantly reminded me of a friend telling me a while back that liquorice allsorts would look really cool. So that is exactly what I have done this evening!


Image from www.pushpr.co.uk
I wouldn't say they were my neatest nail art but I think you can tell what they are?! I think they're quite cool. I was originally going to do each individual sweet per nail but decided that would look a bit rubbish. Most of the sweets are round and it would look strange on a square nail. I was also going to get some blue and pink caviar balls for the 'ball-y' sweets. I bought some little ones especially but they will have to wait for another day. 

For these nails I painted a black base, and then outlined all the shapes I wanted to do with a white nail art pen. I then went over the bits I wanted with pink, blue and yellow nail art pens. I did the white base first so the other colours would show up against the black. I don't know if you can tell, but for the 'ball-y' sweets, I tried to dot the paint a bit to make it look like that texture.

I also got some batteries for my monkey blower nail dryer so thought he definitely deserved a mention in my post! He is so cute and I love him!


It is in fact my birthday tomorrow so I am very happy to have these sweety nails on my hands for my day! 

Friday, 17 January 2014

Day 16: Gradient

Apologies again for this post being late, I did actually do these nails ready for the 16th, but this manicure was really hard to photograph so it took a bit longer than planned! These are however, my 'Gradient' prompt nails.


Once again I tried to think a little more out of the box for this one, than just the standard two tone manicure. This gradient is probably far too summery for this time of year, but we all need a bit of colour in our life sometimes! This is another manicure inspired by the Wah Girls book, but I used colours from the rainbow.

image from wellnailed.blogspot.co.uk

The colours I used are Bright Red by Barry M, Speed Dial by Ciate, Lemon from Barry M, Radioactive by Jessica, Cyan Blue and Berry, again both from Barry M.


 I put on a white colour first to make the colours really pop, especially where the two colours mix on each nail. I (again) used Barry M matte white.
To achieve this look all you need are sponges. A good top coat will seal everything in together and finish the look off perfectly. I used, you guessed it, Barry M top coat.


To make the two colours merge in a seamless gradient, I paint the two colours next to each other on a piece of foil, pick it up on a flat sponge, and dab up and down in the centre of the nail just slightly overlapping from side to side to get the gradient down the middle. It's so so easy, and is a look that is easily achieved but looks quite technical.


This is certainly a manicure I will do again, but I will probably experiment with differnt colour combinations.


Wednesday, 15 January 2014

Lorde Eye Makeup

Lorde is an up and coming artist for 2014, with her single 'Royals' already storming the charts. I got her album for Christmas and I love her voice and music. Hearing her voice, as well as seeing how stunningly beautiful she is, its safe to say I have a pretty big girl crush on her. I first saw the video to 'Royals' a few days ago and was instantly captivated by the eye makeup she is wearing in some scenes.


I have recreated the look the best I can and think it is a really cool alternative to the usual cat eye flick. 

I started by using concealer on my eye area, and using powder to set everything so it was dry. With an eyeliner brush, and using the black eye shadow from my Benefit Smokey Eyes set, I drew a thick line from the outer eye.


I then used a bigger brush, and filled in a triangle from the base of my top lash to form a thicker flick.


Using the same brush, I dragged the shadow from the top of the flick, into the crease of my eye which is created when I open my eye.


To clean up the edges and make it really sharp, I used an eyeliner pen to trace around the triangle. I find these pens are perfect for precision.


Using powder and a concealer brush, I cleaned up the edges and created a more obvious colour contrast between black and white on the eye lid.


I love how this looks like a normal flick from the outer eye at first. But when the eye is shut or blinking, it adds a bit more interest to the eye. I could probably afford to go further into the eye crease, but as Lorde is in a music video, I think this slightly more subtle option would be appropriate for normal day to day wear.

Here is the song if you haven't heard it already
enjoy!


Tuesday, 14 January 2014

Day 14: Nature

As I said in my last 'Nail Art Challenge' post, this challenge has pushed me to do designs I have been putting off because I've been either too busy, or too scared doing in case it goes wrong. I have been so excited about this prompt because it has finally motivated me to do the feather manicure I have been building up to do for months! I bought the feathers for this manicure way back in the summer, and now they have finally been put to use!


I first saw this manicure on one of my favourite nail blogs, The Nailasaurus, and fell in love with it instantly. Her tutorial really helped me for this manicure. You can also buy a feather manicure kit from Ciate, which has all the gear you need. They also have a tutorial video on their website which is really helpful.


I also decided to bring out my Illamasqua duck egg polish again to add to the nature prompt more, to show more of a life cycle of my manicure bird. It reminded me just how much I love this polish. As my duck egg polish is purple, I decided to use purple under my feathers to give it a running theme.


For this manicure, all you will need is a base colour (I used Barry M's 'Prickly Pear' gelly polish),
 a clear top coat, some scissors and a nail file and of course, some feathers. I bought my feathers from Hobbycraft for about £2.99 and the pack is huge, I won't run out anytime soon. 

Once you have painted your nails the colour you want, apply a thick clear coat and place the feathers on so they look like this.


Put on about three layers of clear coat to hold them in place, and go over the ends of your fingers so the feather becomes hard and easier to cut. I must now put in a safety warning (yes I'm serious), when cutting the ends of the feathers off, the top coat will make them very hard and sharp. I touched my face and ended up giving myself a really bad (and quite painful scratch). Only I could scratch myself on a feather.

This from a feather, would you believe it?

To stop such ridiculous injuries happening, file down the ends of the feathers off. Do it more in an up and down motion rather than the usual sideways and across as if you were filing your nail. This will round off the end of the feather and make it smooth (and safe). The finished effect is a smooth, glossy feather effect.


Monday, 13 January 2014

Philip Kingsley Haircare

I have just finished using this Philip Kingsley haircare, and here is how I got on with it.


Elasticizer

I have used the Elasticizer hair mask before which you can read a full review of here. I really liked this mask when I used it, it made my hair feel soft and a lot more manageable. It is a pre shampoo treatment.

Shampoo

A lot of natural shampoos do not contain an ingredient that is designed to make a shampoo foam. I am not 100% sure is this Philip Kingsley shampoo is even considered natural, but I can tell you that it did not foam up. At all. Not even lather slightly. Now since using this shampoo I have started using an Aveda Shampoo which is considered 100% natural, and this foams up more than this Philip Kingsley Shampoo. I was recommended the 'Moisture Balancing' range from a Philip Kingsley representative.
I am not going to slate a product, because what doesn't work for me, may work fantastically for someone else, but this Shampoo did not clean my hair AT ALL. After I had washed it, it still felt greasy. My skin has recently changed and become more oily, and I thought that my hair was getting greasier because of that, but since changing my shampoo, I could tell from the first wash that the Philip Kingsley was just not washing my hair properly. As the product didn't foam up, I think it got lost in my hair instantly, and as my hair is thick, it just didn't sufficiently clean it. I tried using more water, more product, but nothing happened. Very disappointing.

Conditioner

The conditioner was slightly better, I used it only on the ends of my hair and it moistures the ends to the standard I would want. I wouldn't say it was the best, but it does it's job as a conditioner. There was no particular smell or anything else that would draw me to it to make me buy it again, it was just a basic conditioner.

Daily Damage Defence

The daily damage defence is hard to review as it is a heat protector, and I can't really tell you if my hair was well protected or not. All I will say is that my hair has not seemed dry or burnt at all, and the little spray lasted me about 2 months.


Not a sparkling review I will admit, but I think it is important not to view everything with rose tinted glasses. I do look for positives in products, but I was actually quite relieved actually when I stopped using these. Philip Kingsley has been around for such a long time it feels almost wrong to not like the products, but perhaps if I used a different range from the collection I would get on better, but after this experience, I am not really interested in trying the Shampoos and Conditioners from Philip Kingsley. I would rather stick to there styling products and treatments.

Sunday, 12 January 2014

Day 11: Pastel Blue


I am only a day late with this post so I'm getting back into the swing of things! This prompt for the nail art challenge was pastel blue. I used my Mac nail varnish which is called 'Hyperion' and is actually a cream! I think it has a very light blue colour though.


I did not use ANY water for this 'marbel effect' manicure. I have tried using the water technique and it is one that needs to be practiced a lot. I saw this technique, again, in my Wah Nails book. First, I used a coat of Barry M 'Matte White'. When this was dry, I then blobbed big dollops of the blue and white, and merged them together using a cocktail stick. Its quite thick and tacky so needs to be left for a while to dry, but can then be finished of with a top coat. The finished effect looks exactly the same, but is easier, less time consuming, and not as messy.


I love the effect of this manicure and will be experimenting with other colour combinations in the future. I think this blue/grey effect looks like smoke and I love it!

Saturday, 11 January 2014

Day 9: Pattern


So today I should be posting you my 'Day 11 nails: pastel blue'. However, I have still not posted my 'Day 9 nails: pattern'. I can only apologise for my lateness, I have been a bit ill so haven't been as speedy with my posting as I'd like. I have however done my pastel blue nails and they are on my instagram page NOW if you want an exclusive look! Please follow me on there as I tend to put my pictures on there first!
I'm really enjoying this nail art challenge, because the prompts are pushing me to do designs I only debated doing before, and pushing me to think outide of the box a little. This design in particuar made me reach for my Wah Nails book and search for this Python skin pattern which I only breezed over when I was reading it before.


This nail art was inspired purely by the nail polish I had on that day! After my previous post of the Mavala Metropolitan Collection, I left on the Emerald Gold colour. As I said in the post, a lot of the comments I got wearing this polish were "thats very mermaid-y", so I thought my pattern post should enchance the mermaid effect of the polish even more. And so here are my scale nails that look slightly marine/reptile. 


This design was also inspired by 'Brit Nails' who stamped black over a similar colour. I was going to use my stamper originally as I want to embrace it a bit more, but I didn't have a plate with the scale effect I wanted. I just freehanded these scales with my black Models Own nail art pen.