Sunday, 23 June 2013

All In a Days Work

On Friday at work I came up with a whole nail wheel of designs for the up and coming 'Festival' theme we were having where I work. My job was to design some festival-y nail art, and here is what I came up with! Admittedly, I went on a bit of a tangent to strictly festival theme, but I seized the opportunity to re-do some designs I did a few years ago, before I knew about nail art pens and was not very practiced, which is something I've wanted to do for a while. I used a variety of bold colours and funky patterns. I created these all with Mavala nail polish, a few extra tools and a couple of black and white nail art pens.


(From left to right) 
1. You cannot see this design very well but it was just a dark purple colour, half matte and half shiny. 
2. This is just a simple polka dot design. The dots are not perfect as my nail art pen gets a little bit clogged sometimes.
3. Galaxy nails. I LOVED re-doing this design. I did about a year ago with more gold colours but have seen so many better variations of it since so I went with a more purple-y pink colour this time, and I love it. I think I will wear this on my nails soon!
4. A simple pink colour with the 'peace' symbol.
5. Leopard print
6. Small flowers.


7. Blue Aztec. I have done this design before but I am still not 100% happy with this. I want to practice it more to make it perfect!
8. Another design I have done before, this time I used larger blobs to create bigger roses.
9. Rainbow. I have never done this one before and was scared the colours would merge but I'm pretty happy with the final result.
10. Stain Glass Window. This is one I've seen in my Wah nails book which I have wanted to try This was the first time I'd done it and I'm pretty excited to do it on all my nails soon!
11. Strawberry. This design is very important to me as it was the very first bit of nail art I tried a couple of years ago, and it is the design that made me fall in love with nail art! Very close to my heart this old strawberry!
12. Melon. Have done it before and wanted to try it again as its so simple and really cute.


13. Carrying on the fruit theme, this is a pineapple I tried for the first time! It had a lot of potential to go wrong but I think you can tell what it is!!
14. Zig Zags
15. You'd think as a nail art fanatic I would have done this before but believe it or not, this is actually my first attempt at gradient nail art, and for my first attempt I was pretty happy! I also added the silhouette palm tree at a friends request!
16. Beach Scene
17. Ladybird. A friend had tried this before but I hadn't so had a go myself!
18. Converse shoes which I have done before! 


Here are some close ups of my favourites!
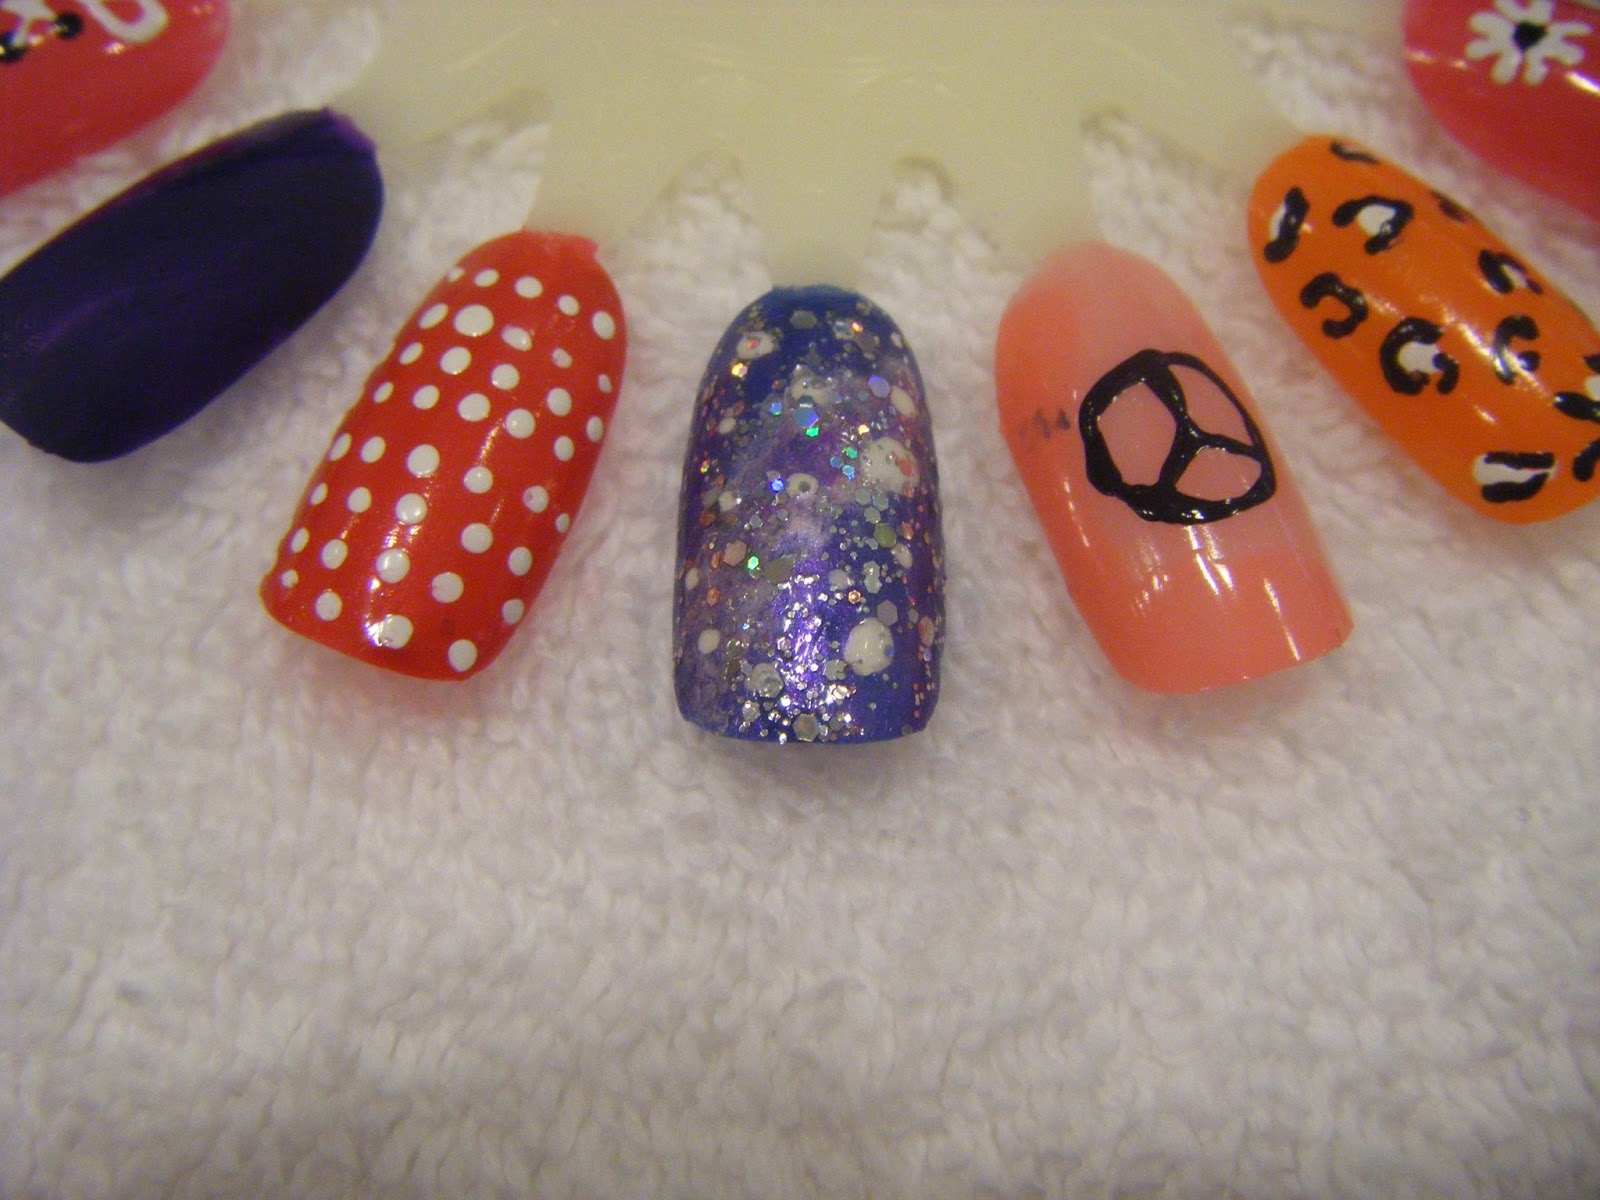
Close up of galaxy nail
I used a dark blue then rolled a cotton bud with white polish on it and gently rolled it across the nail. I did the same with some purple, added some white dots for stars, then finished with a glitter top coat to add real sparkle.

Close up of gradient

First I painted the nail orange, then whilst still wet, I dabbed on the pink using a makeup sponge. The back silhouette I did free hand with a nail art pen. 

Close up roses

For the roses, I first blobbed on pink, then using a manicure stick, I blobbed the green either side of the red. Using a nail art pen I outlined the leaves and roses and added in the swirls of the roses.

Close up mosaic
Again, I blobbed on the different colours, then filled in the gaps with a black nail art pen. Really simple but effective.

Wednesday, 19 June 2013

Chanel Coloured Mascara

Excuse these new random posts I'm doing showing off the latest ad campaigns in the makeup world. These adverts are really quite inviting and I'm using my blog as a kind of pin board, to show you what I am interested in, and my kind of inspirations that I want to try out. The latest one I have found myself staring at, is the new Chanel advert, picturing their new coloured mascaras. Coloured mascara is by no means modern or the latest thing, but I really love how the eye shadows mirror the mascara, creating a really cool summery look. Similarly to the Mac campaign, matching nail colour to eye makeup, is a big thumbs up for from me!


*pictures courtesy of google

Thursday, 13 June 2013

O.P.I Minnie Mouse Collection


This is the second Minnie Mouse collection from O.P.I. This collection captures the more sultry, grown up Minnie. The vintage Minnie collection that came out last year was so popular they decided to bring out a new, more couture collection, inspired by the London and Paris catwalks.

Last year's vintage Minnie Collection courtesy of Google
The new five piece Couture collection is sure to appeal to all women, with different shades and textures throughout. Where as the last collection was quite girly and pink, this collection is more sophisticated has deep reds and chic pale pinks.


'Chic From Ears To Tail' is a light bubblegum pink which is fun and cute.


'A Definite Moust-Have' is a coral colour which is right on trend for summer. Its bright and beautiful.


'Magazine Cover Mouse' is the only liquid sand in the collection which is very popular the year. The textured red adds some sparkle to red.


'Innie Minnie Mightie Bow' is the deepest most sophisticated of the bunch.


'Minnie Style' is a confetti style polish that would look great over any of the above polishes. If you build this up it could also look really effective on its own.

O.P.I and planning some Disney inspired collections such as the edgy side of Tinkerbell! What Disney characters would you like to see in a nail collection?

Tuesday, 11 June 2013

Matchy matchy

Bit of a random post this one but i just wanted to share! The new mac ad campaign is something that really captures me every time i see it. I think its because it it is really simple, but really cool and edgy, with striking colours matching nails to eye shadow. This is a trend I have seen occurring in magazines, and one that is easy to achieve. If you don't feel as bold with your eye shadow, try matching your nails to your lipstick.

Tuesday, 4 June 2013

Caudalie Divine Body Range

If you read my blog, then you will know that I am pretty obsessed with a french brand called Caudalie.  My most favourite product is 100% the divine oil, a dry oil that can be used on the skin, hair and in the bath. The most endearing thing about the product is its fantastic smell! You will not be surprised to hear, that I was absolutely ecstatic to hear that Caudalie were bringing out a range, inspired by the divine oil.


The new range now has two sizes of divine oil, a body scrub, scented candle and a tinted moisturiser.
To read my review on the original divine oil read here

Divine Legs - The divine legs is not a self tan, but a light-weight lotion that adds a hint of colour. Not only that, it encourages natural tanning. It's like body makeup that washes off. This costs £26.00 which isn't the cheapest on the market but the amazing smell makes up for the price. The smell is exactly the same as the beautiful oil, just more thick and chocolatey. 

tip: this product tends to cling to hair so I would advise using on freshly shaved legs!

Divine Scrub - This amazing scrub is made from four plant oils, grape, argan, hibiscus and sesame. The actual scrub aspect is made from brown sugar. It costs £21.50, and again, has the characteristic divine smell.

Scented Candle - As you can tell, I am obsessed by the smell of this range. I would go as far to say it is my favourite smell ever! If you feel the same, then why not purchase the scented candle to surrond yourself in it? It costs £24.00 but is quite reasonable size.

  I am so excited about this range and cannot wait to try everything.


Wednesday, 29 May 2013

Dr Hauschka

A few weeks ago I was sent on some training in London to get to know a bit more about Dr Hauschka. Its a brand that has been in the department I work in for a while, and people come in and buy tons of it and never buy any other brand again. To be honest, I never really got what the fuss was about so I was quite excited to learn a bit more about the products.

The brand itself has some interesting theories about ingredients and the way our skin works. Its a pretty hippy company, that love fair trade natural ingredients and that come from all over the world. They also talk about the rhythms of the environment and how we should work with them in really intense environments, so they work their best. This all sounded very good to me, and I have to say the woman lecturing about the products had the most amazing skin I've ever seen, and she was quite a mature lady! I must also mention that Jennifer Aniston was quoted in their booklet saying she'd grown up with the stuff, so that also made me want to know a bit more as well!

At the end of the training I received a little tin containing their daily skin care products which retails at £17.95. This is how I have been getting on with them.


Cleansing Cream- This cleanser is a Dr Hauschka must have, but some people are a little put off by it. Being an entirely natural brand without perfumes etc. some products can be a bit choice when it comes to smell. When I first saw the brown paste come out, my eyes and nose were telling me not to put it on my face. If you give it a chance though and let it do its job, it really is quite pleasant! The chamomile, calendula, athyllis and almond meal don't smell too great, but the mix of these soothing ingredients helps balance the natural PH of your skin. It has quite a lumpy texture but if you press it into the skin rather than scrub it, it will lift up any dirt from your face. It leaves your skin feeling touch-ably smooth and really clean. Trust me when I say not to judge it by its appearance!

Cleansing Milk- If the cream doesn't sound like your cup of tea, then the milk may be more up your street. Its a much more normal and recognisable consistancy, and its very soft and soothing. The milk also removes makeup so is great as an evening cleanser. It is made from jojoba and sweet almond oils.

Facial Toner- One thing you should know about Dr Hauschka, is that he doesn't believe in a night cream! This is super controversial in the world of beauty, as a lot of ranges have a cream for night time use only. Whilst we sleep, our skin works really really hard to balance and renew itself, and Dr Haushchka believes we should not slap on a heavy cream when it is already at work. The facial toner is the alternate, as it balances the skin and is super lightweight. The toner comes in a spritz bottle and as they're award winning product, they recommend to just spritz it on your face whenever you get a chance, as it helps the natural oils and maintains elasticity.

Moisturising Day Cream- We are now onto the moisturisers in the range, and the moisturising day cream is the simple starter moisturiser which activates moisture in the skin. Again, the smell is quite strong and slightly clinical, but once it has sunk into the skin, you can't smell it at all. This is my favourite of the three I was given, as it goes into the skin easily, and feels very moisturising. For me, the consistency could be a little thicker as I felt I had to use quite a lot, but once on, I was happy with the results.

Rose Day Cream- The rose day cream is ideal for anyone with dry, red skin, as it is a reparative and calming moisturiser. For me, this cream was way to thick, and I do suffer from fairly dry skin. The answer to this is the 'rose day cream light', which does the exact same thing, but just has a thinner consistency which I think I would prefer.

Quince Day Cream- Finally, the quince day cream is a protective cream made from beeswax. It isn't designed for a skin type in particular, its just a protective cream for the colder months perhaps.

Although it wasn't in this tin, there is also another cream called Melissa Day Cream, which is designed for combination skin. It is not in here because there is an entirely different tin for oily/combination skin which you can find here. Dr Hauschka is also in high demand due to its makeup range. Unfortunately I have not been able to try it but please let me know if you have!


Is natural face care something you want to try? Does Dr Hauschka sound like something you'd be interested in?


Tuesday, 28 May 2013

Ombre Lips


Ombre has been the trend of 2012/2013, from hair to nails. A new trend I have noticed emerging, is ombre lips. The first time I saw this,was on the Illamasqua website when researching their duck egg polish I reviewed a while ago. The ombre lip is just as you'd think, dark on the outside, and lighter towards the middle of the lip. It's quite an unusual look so probably wouldn't be something you'd do everyday, but for a special occasion, I would definitely recommend trying it, plus its all good fun!

For this look, I used Rimmel '04' from the Kate Moss collection for the purple colour, and for the pink, 'Stormy Pink' by Revlon which is one of my favourite lip colours ever!


To start, line your lips, and put the darker colour round the edge of your lips. It doesn't have to be to neat.

Using a lip brush, sweep the colour into the middle of your lips.

Lastly, use your lighter colour, brush the colour into the middle of the lips and blend between the two colours.

For a less dramatic look, or a more daytime option, use lighter colours.


For this look, I used Mac's 'Chilli', and the Helen E 'Caribbean', which I recieved in a Glossy Box a while back.

For more information and a video tutorial, click here for the Illamasqua colour chooser and tutorial