I have recently really got back into doing nail art. Seeing some of my favourite brands such as Wah Nails and I Scream Nails doing all their summer designs has my camera roll filled with screenshots of designs I want to try.
This design is taken from the I Scream Nails nail art book and it reminds me of the 90s theme credits from 'Saved By The Bell' and it is so simple to do but looks really effective.
The base I used is my current go to colour at the moment, which is Pinking Out Loud from the Barry M Sunset Gel collection. It is such a great bubblegum pink colour perfect for summer designs.
Using pastel colours on top of such a bright base will really make the pink pop. In all honesty, I have no idea what kind of shapes work with this design, but these sharp pastel zig zag shapes work with the black and white dots and stripes to make a contrast and big impact. I would love to try out some new fun combinations in the future.
If you have any ideas of fun colour combos or other shapes you think would work I'd love to know.
Keep your eyes peeled for more fun designs whether it is 90s style or another design with this amazing pink base.
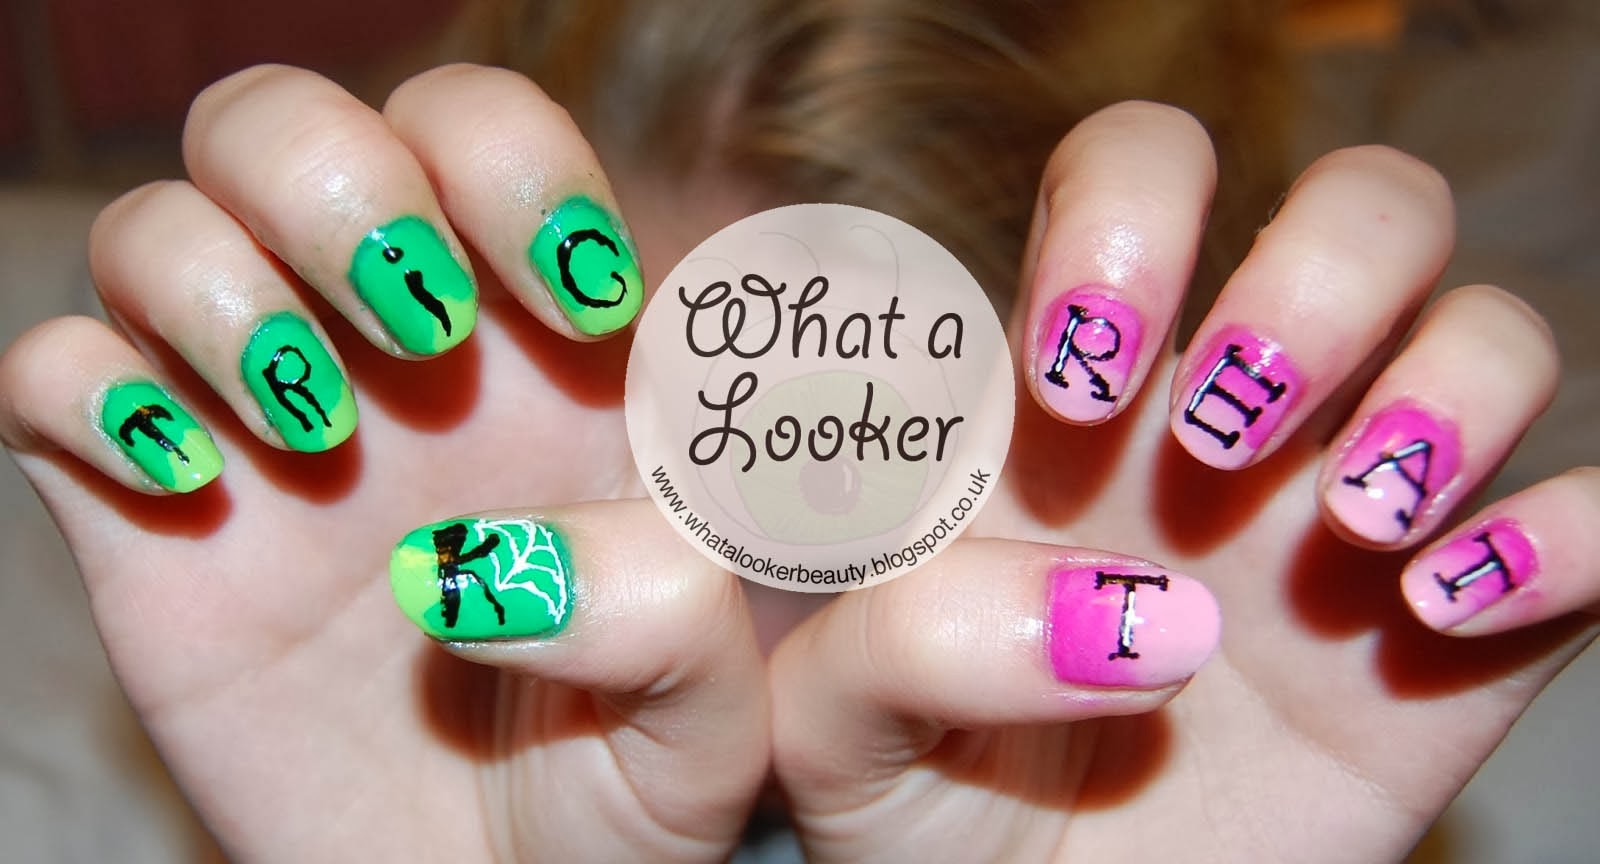
Halloween is fast approaching! Usually I would dress up and go trick or treating with my younger sisters on Halloween and I still could not pass up the opportunity to do some trick or treat themed nails so here is what I came up with!
To create this look I used two different shades of pink of green and used a sponge to get the ombre effect. The colours I used were Jessica 'Radioactive' (told you I would use this soon!) and 'Spring Green' by Barry M. For the pink shades I used Barry M colours. 'Strawberry' for the pale pink, and the other colour I don't know due to the sticker falling off! Its just a hot pink colour though. Sorry!
For the lettering and highlighting and little cobweb I used my trusty nail art pens.
Please excuse the green cuticles in these pictures, it is really quite tough to get off! I need to invest in some acetone.
I wanted to do more to them, like add sweets and eggs and ghosts etc. but I think it would have over crowded it too much, so maybe I'll save those for another time! I did however take the opportunity to pose my manicure with some halloween-y treats just for a change!
Hi everyone! Today is the first manicure of 2015, and I have been inspired by a T shirt I got from Topshop before New Years. The Yin and Yang symbols are globally known, and represent the light and shade, and when together are a balance. I just bought the T shirt cos I liked it.
I took a screen shot these nails by 'celinedoesnails' absolutely ages ago because I liked them, and this reminded me that I had wanted to try them.
I decided to do a gradient as my base, so chose these colours, as I wanted purple-y tones. I chose 'Bright Purple' by Barry M, and 'Skinny Jeans' by Ciate, and sponged the two colours together on top of a white base coat to intensify the colours.
I then used nail art pens to draw on the Yin an Yang symbols. I started with a white circle as it is easier to get a stronger colour on white, and then added the black side on top, and finally the opposing dots.
Hope you enjoy, and keep your eyes out for new posts this week!
Hello everyone, welcome back! Hope you are all over your food comas from Christmas, and haven't been too spoiled! Today's prompt is 'Sweater', and as we all know, the tacky, typical lary jumper is a fashion statement these days. The more old fashioned, badly-knitted-by-your-Nan, and homemade looking, the better.
I saw this jumper from Warehouse at work, and although I do not own it, I quite liked the colour scheme of it, so I went ahead and did my nails based on this!
I actually did these a while ago and these were the first designs I tried with my new Barry M Nail art pens, so I wasn't quite used to them. I'd have preferred the detail of the reindeers to come out neater, but I can always try again in the future!
Only a day late for these! For the 'sweets' prompt this year I decided to do some Gingerbread as I've done candy canes before.
For these sweet treats, I used Barry M 'Mushroom' as a base, and then used the Barry M nail art pen in white for the gingerbread. I'm having problems with this pen in the white too, as the colour isn't very vivid, and I have to keep going over it to get a true white colour. Again, it goes a bit dry and cracked too so think I won't buy these pens again, which is a shame as I am a big Barry M fan!
Stay tuned for the rest of my nail art challenges!
If you follow my instagram account, (which you toooootally should) then you will have seen that on the 11th I was a little busy and couldn't get round to doing any 'Lights' nails. Instead I posted a throwback of some I did a while ago.
While I could have just got away with these, I really like to redo designs I've done before as I know I can do them much better now. So today I got down to it and did some new and improved Christmas lights, and here is the result:
For these I used the gold foil polish from Barry M, and then used the Barry M nail art pen in black to outline the individual colours I blobbed on.
I'm new to these nail pens as nowhere in my local town stock models own anymore (:( ), so I've been trying these. They are easier to use, but I don't think I like the finish they give. It gives a dry cracked appearance once dry, and isn't as fluid as the actual paint that comes out of the Model's Own pens. I will keep practicing and let you know if they improve!
For some reason, I have recently been watching lots of makeup tutorials just before bed as I find them really soothing and relaxing. Maybe it's watching someone apply a full face of makeup when I'm lying in bed all clean, that I find so comforting, but it means I have been waking up the next morning feeling a little more inspired about what kind of new makeup looks I want too try. One in particular that stood out to me, was Emma Pickles 'Black Lip' tutorial. The black lip isn't something I will be sporting anytime soon, but I really liked the eye makeup she does, as I think it's very pretty for this time of year. A bit smokey but also quite warm.
I'm not a very 'make-upy' person, so as amazing and beautiful some high end makeup palettes are, I can't justify spending a fortune of them as I know I won't do it the justice it deserves.
I went into Boots the other day and spied this Barry M eyeshadow palette which is a dead ringer for the Urban Decay 'Naked 3' eye shadow collection, that had people going crazy a while ago. I think the similarity is no mistake, as the packaging and colours are incredibly similar.
I jumped to get this palette, as the red-y pomegranate colour in it, is something similar to the 'Russet' colour that Emma uses in her video, which is the colour that really drew me to that look. The colour 'Russet' is from the Sigma Warm Neutrals Palette which is $39.00, so the sort of palette I was talking about earlier that I would waste!
The Barry M Natural Glow 2 palette is actually really versatile, as it has a range of lighter and warmer tones. Number 3 is the red/pink tone I lusted after, but towards the higher numbers, there are some really nice metallics. Finally that dark number 6, is a really warm brown that can be used for a bolder look.
Number 1 is an almost skin toned colour, which is quite handy for clean up but also for highlighting around the eye. Number 2 is a really warm mushroom grey which is nice for a more subtle everyday look.
The larger palette on the right is an eyelid primer, to make sure the colours stay put, but I personally don't think it works that well, and goes on a bit smudgey. I think a normal face primer would do a better job.
Overall, I really love the colours in this palette, however the pigment in them is not fantastic. If you are a confident eye shadow wearer who likes to build up a lot of different colours for a dramatic look, like Emma Pickles for example, then this is not the palette for you, as I imagine you will quickly become frustrated with the lack of immediate intensity, and spending a little more money on a palette may be a better option. However for me, this more opaque palette gives me the confidence to be experimental with makeup, without having to commit to the scary prospect of panda eyes. The colours are quite buildable, so you can find something your comfortable with wearing and then build it up more to make it a bit more intense. For £6.49 though, this is a really great investment to spice up your daily eye look.
Sorry I have been a little absent recently, I had a terrible bug the week before last, that wiped me out completely and its taken the last week to sort myself out. But enough about the rubbish illness the Autumn brings, and on to the amazing new things we get!
Autumn has to be my favourite season. It's a nice crisp season but still a bit sunny and fresh... on a good day. I love all the orange and dark brown colours you see in nature and also in the beauty and fashion world. Dark lips and metallic eyes are some of my favourites, but of course I also love the new nail colours! My newest one is this Barry M colour called 'Mustard' from the Gelly collection. I have been looking for a colour like this and it was the last one on the shelf so I knew I had to snap it up.
Now I am under no pretense that this colour looks good on me. As a fair skinned blonde I simply CANNOT get away with wearing any shade of yellow, even a warmer one like this. It washes out my skin completely, however it is such a useful colour for the nail art collection, and my Ikat nail design you are about to see really warmed up the colour and added a more orangey tone to it which works better for me.
I used 'Mustard' as my base and then blobbed on some really rough diamond shapes using 'Bright Red' also from Barry M. There was another Gelly from the new Gelly collection called 'Paprika' which I would have liked to use for this part, as I think it would have warmed up the mustard even more, but maybe next time.
Once I'd done the red diamonds, I did some smaller white diamonds in the middle. Finally, I dotted a black diamond in the middle of the white, and then drew long black lines in a downward motion on the outside of the red diamond.
Ikat is a rich weave so you don't have to be particularly neat at this stage because you want that stripey woven affect. This is actually quite easy to achieve if you have a steady hand. A lot of tutorials suggested using a small brush to get the woven affect but I just used my black nail art pen and feel I still got the same desired look.
I'm glad I used more Autumnal colours, as I think it looks quite native american which is what Ikat reminds me off.
Be on the look out for more Autumnal manicures coming soon!
Hello everyone! today I am posting about some nail art that I am actually pretty proud of. It's been a while since I've looked at some nail art I've done and thought 'that looks pretty good'. Maybe I've been going for more ambitious designs such as my Glasto tie dye nails.
Anyway! these are actually pretty simple to do, all you need are the items below plus a white base colour and a sponge.
You will probably be surprised to hear that this is actually the first bottle of acetone I have ever bought, which is pretty shocking as a nail art lover. I think as it is very strong I've always been a little bit scared of using it as it is designed to completely remove false and gel nails, but it is fantastic to clean up around the edges of nails which is essential after any gradient manicure (If you look back at any gradient I've blogged about before my clean up is always very minimal).
The two colours I chose for my gradient were 'Strawberry' and 'Peach Melba' by Barry M. They are very thin pastel colours and actually quite difficult to gradient with. I ended up just painting the two colours on the nail and then dabbing in between to merge them which is a bit of a cheat way to gradient, and is probably why I didn't get a perfect fade from one colour to the other. The formula of the polishes were just too thin though. Using a thicker polish is easier as the sponge picks it up better.
As my gradient wasn't as flawless as I wanted, I decided to add some silhouette palm trees to give it a sunset summer vibe. I just used the striper brush side to my Model's own nail art pen, and added some thinner swipes along the leaves to give it a more realistic plant effect. I'm not going away on holiday this year so these nails will have to be my retreat! Hope you like them!
Hello there readers! I hope you all had a lovely Easter holiday break. Apologies for being quiet the last few days, I would have normally done some nail art for Easter, but I had such a busy weekend I will explain more in a post to come.
However, just before my busy weekend started I decided to do some nail art as it has been a while and my nails are in better condition now :)
I bought this midi ring from Topshop a few weeks ago, and the flamingo shape inspired me to do some summery pink nails. The base coat I used was very aptly named 'Flamingo Pink' by Barry M, and the Hawaiian style flowers were done with nail art pens.
The flowers on their own looked a little sparse, and I wanted that really garish Hawaiian shirt feel so added some bright squiggles and spatters.
Hope you like them, I have lots more nail art designs coming up so keep your peepers, peeled!
Any of you who read my blog regularly, will notice that on the right hand side I have a new panel of 'Things I like'. Under there is the 'Eat Sleep Knit' link, which I advise you should all go and look at. Fran is a friend from school, and she knits a huge array of cool hats, scarfs, gloves and other hand crafted goodies. Her creativity inspired me to do these knit inspired nails.
I first saw these nails on 'Polished Elegance' and thought they looked really cool and effective. I wanted to do more of the knitted pattern, so did that on all my nails apart from the thumb, where I imitated the balls of yarn. I loved the colour scheme and thought it tied in quite well with the 'Eat Sleep Knit' logo.
The colours I used were 'Electric Teal' by Jessica. 'Cobalt Blue' and 'Bright Purple' both by Barry M.
I used my models own nail stripers to create the knitted effect, and wiped of the striper so there was barely any paint on it, to get the more gappy lines to give the knit effect. If there was too much paint I feel it would have not looked knitted at all.