Sunday, 20 March 2016

Mermaid Nails


Todays nail art is actually some I am really happy with as I took a fairly long time doing them and I feel I worked hard for them! I also did BOTH hands (I usually have two different designs on my hands) which is a pretty big thing for me!

It all stems from the Sally Hansen polish, 'Making Waves' that I was gifted a few months back. Usually I am not a fan of metallic colours as I feel they can look a bit tacky sometimes, but when I tried the polish on for the first time the other day all I could think about was mermaids.

The aquatic blue shimmer it gives is actually really pretty, so I decided to do some underwater themed nails.


I did my left hand first as I am right handed, and slowly did the scales on every other finger. I then outlined in white the starfish and the shell, then outlined them in black to make them more prominent.
The shell in particular was really hard as I wanted it to be really neat.


My right hand was a whole new struggle, as using nail pens with my left hand gives me immense hand cramp after a while, so I need occasional bursts of stretching and moaning to my boyfriend.

The jellyfish was fairly simple however trying to get a perfectly round circle for the pearl was hard work! I added some white detailing to the pearl as I thought black would make it look like a cartoon bubble.


After that, I used a whitey/pink irredesant colour from H&M, over the top of the whole design, to give it another shimmery effect, which looks much better in real life I have to say!
It makes a really pretty colour on top of the blue, and adds that extra mermaid feel to it.


These here are the products I used! Hope you enjoyed


Wednesday, 9 March 2016

Australia Red Center Inspired Nails

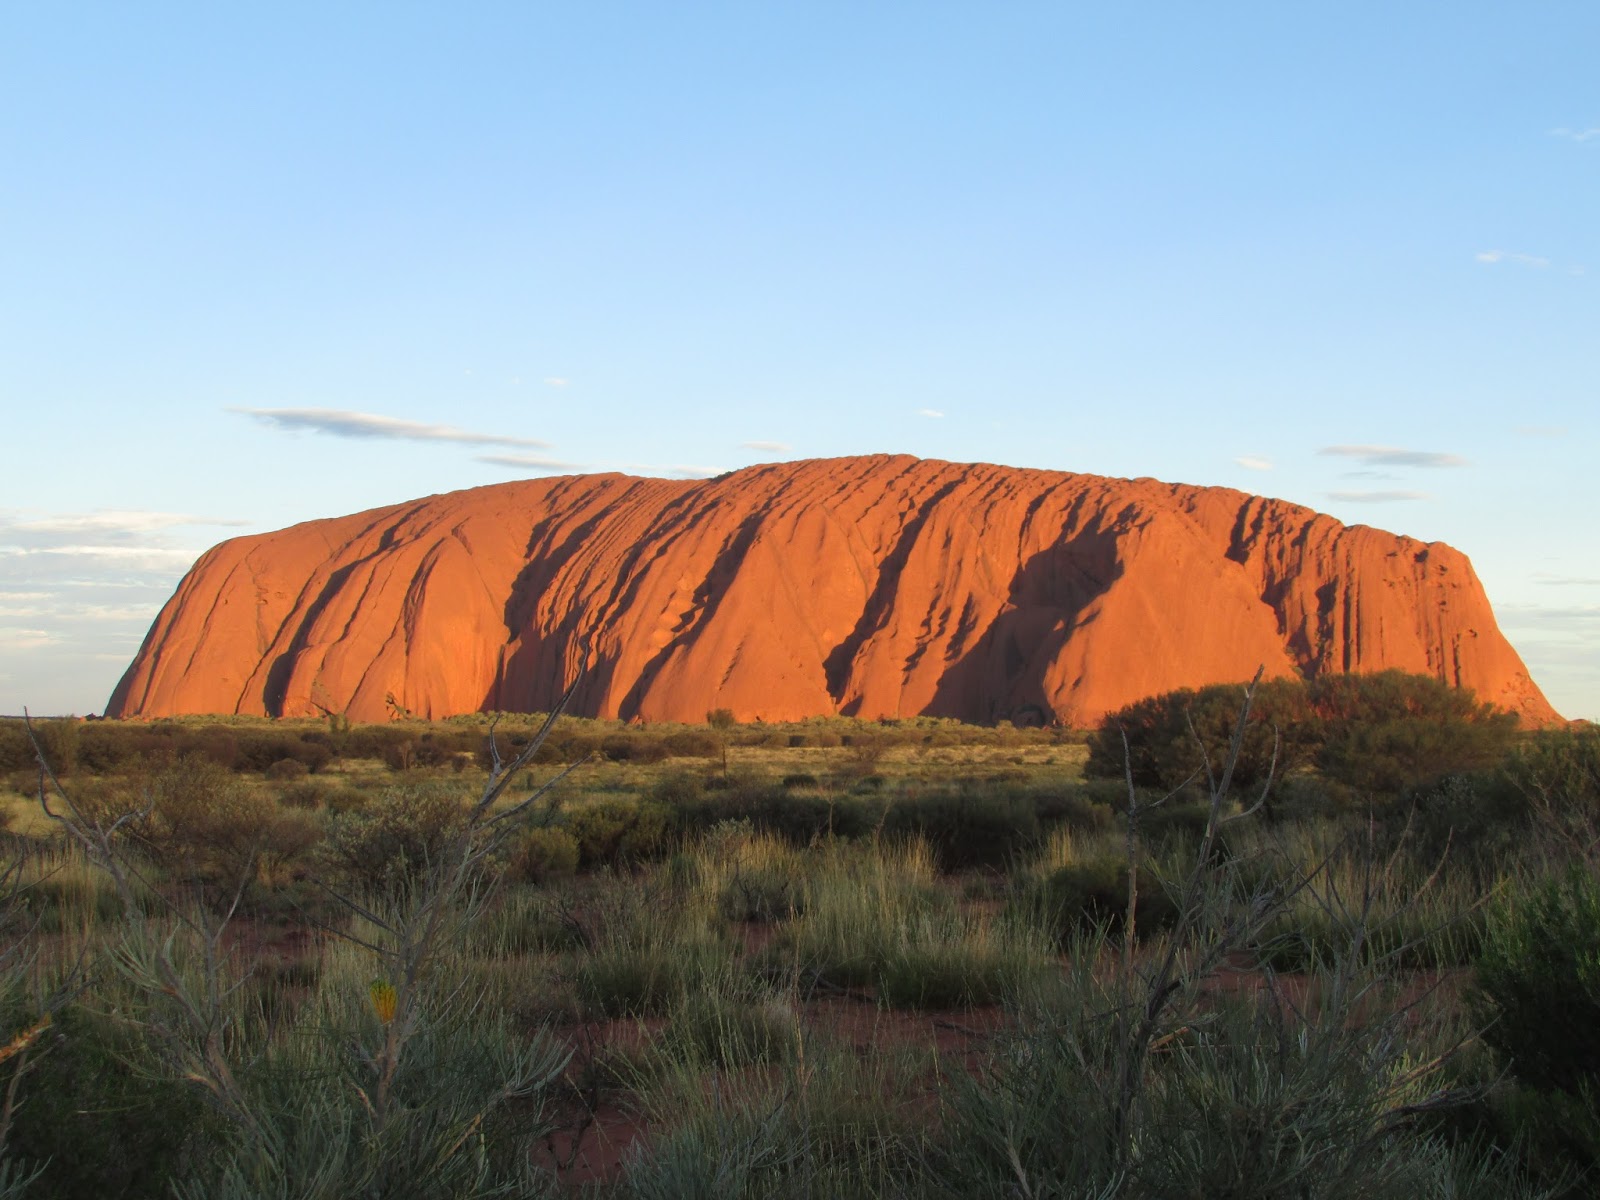
Hi everyone, if you follow me on Instagram then you may have seen a picture of myself at Uluru (or Ayers Rock), as I did a long road trip to get there the other week.
The Red Centre was a beautiful place, and the colours and aboriginal influences really got my creative juices flowing for some nail art!
As I'm travelling, I do find it really hard to juggle regular blog posts, especially in the outback as there is absolutely nothing, so wifi is a laughable ask to most people. Hopefully, I can reflect my trip to you though, as well as telling you a little bit about my journey along the way.

So lets get started

Coober Pedi

So to start my journey into the centre, we started in Adelaide and drove North. It took us 4 days to get to the middle, but we stopped at a little town called Coober Pedy for 2 nights to break things up. This is honestly one of the weirdest places I have ever been in my life, but I am so glad I went just for the stories to tell people. Coober Pedy is a mining town, and what you mine at Coober Pedy, is opals.
Opals are a precious stone that vary from clear to a gorgeous blue green colour, so I chose this polish called 'waves' by Sally Hansen, to give myself a Coober 'Pedi'.


 I wish I could take credit for the pun but it was all my boyfriend, however how someone hasn't set up a business in this place called that I do not know!

(Can I also just say that never did I ever think I would post a picture of my toes on the internet but alas, here we are. Be kind, I know they are not pretty feet but can anyone honestly say they have seen pretty feet?)

In Coober Pedy I also had the amazing experience of going to a kangaroo orphanage, where I met little baby Mona who lives in a handbag!


Aboriginal Art Nails


So another really cool thing I got to do at Uluru was take a dot painting workshop, where an aboriginal artist taught us a few basic symbols for us to create some work ourselves. It was so interesting to learn the symbols, as they can mean so many different things.
Whilst at the workshop, the lady taking the class did some art as well, and in the same space of time as us, she created the most beautiful blue water hole themed picture.


Just on this bit of nail art alone, I have done a little story about my trip here.
See if you can guess what I painted about!

Uluru Ombre


Now if you are anything like me and travel crazy, then you will have seen the mystical Uluru in real life or at least in pictures. I once saw a picture of it at different stages where it looked so different in colour, I knew I had to see it myself to believe it.

Although some say it is just a rock, (which yes, yes it is), it is a really spiritual place for the indigenous people of Australia, and you are actually not allowed to take pictures in some places as a sign of respect. Another thing the indigenous people ask, is that tourists DO NOT climb the rock, as they find it disrespectful, and also quite stupid. It is dangerous and it is causing environmental damage to the waterhole and rock itself.

There is currently a petition to try and get it stopped, so if you head that way, make sure you sign it!
One thing that we and the aboriginals can agree on though, is that the rock is really beautiful.

I saw the rock in the middle of the day, sunrise and also sunset, because it truly does look a different colour all the time. Sometimes it can be a really burnt orange colour, and others, it looks a beautiful purple.

Sunrise

Sunset

My favourite time was just at sunset though, as the sun ducked behind the clouds and gave the rock a pinky red hue, so I used this as the influence for my mani.


Obviously my travels take up a lot of my time currently, but I already have a few more nail art ideas in the works so hope to do a few more posts soon! 

Thanks for reading!

Wednesday, 13 January 2016

'Adore Me' Lingerie Inspired Makeup

Hello readers! Welcome to 2016! I thought I'd kick of the new year with a really exciting post! 

Jessica from New York based lingerie company 'Adore Me' has inspired me to create a winter inspired makeup look to compliment a sexy lingerie set of theirs. As some of you may know, my current travels in Australia mean I haven't been able to do any winter makeup looks, so I jumped at the opportunity to get a bit seasonal.

She sent me over some really lovely visuals of their gorgeous lingerie, but the set below really stood out to me. I love the detail on the back of the bra, as well as the floral burnt orange and black lace combo, and it really got my creative juices flowing for a makeup look.


Autumn is my favourite time of year, as I love the oranges and warm tones of the season. I wanted to create a makeup look to reflect this, so I came up with this smokey eye look, with a bit of orange zest.
I wanted the look to mainly focus on the eye, as eyes are the window to the soul, and focal point for seduction. Gold and orange brown tones work great for blue eyes, so that's another reason I chose this sultry look.


I started with my usual base makeup which is my Ren BB cream, and Rimmel 'Wake Me Up' concealer. I used my beauty blender to get a smooth finish and I didn't use a full coverage foundation as I wanted the skin to be light and dewy as its quite a heavy eye look. 


I then added some light contouring using the 'Hot Sienna' bronzer in my Estée Lauder palette.
Using the same bronzer, I created the orange/brown base for my eyelid. I then started to smoke around the orange with my Benefit smokey eye kit, carefully blending in the colours. 


At the end I lightly went over the orange to make it pop, and then added 'Nude Fresco' from the palette, for some gold tones in the corners of my eyes to make my eyes appear bigger and to make a gradual ombre. 


I finished of with some gold under the eye, a slick of Lancome Hypnose mascara, and a classic cat flick to define the whole look.


To keep the look warm, I added my nude Chanel lipstick called 'Adrienne', as this complimented the the eyes, but kept the focus firmly on them.

Coco Rouge shades from left to right: Adrienne, Coco, Roussy, Arthur and Emilienne.

As I'm a firm believer in using your nails as an accessory, there was no way I could resist doing some matching nail art to tie everything together. I used my H&M polish called "brickwork" and painted on some black half moons to add an extra touch.


New Year is a fantastic time to boost your confidence and plunge yourself into what the year has to offer. I highly recommend having a look at the adoreme.com website to find yourself something to make you feel empowered! Not only do 'Adore Me' do lingerie, but pajamas, everyday underwear and corsets so there is something for everyone. Their website also has a handy quiz, so you can find your perfect match in just a few questions!

Now we can safely say the Christmas dinner sluggish feeling has worn off, why not make yourself feel super sexy again?

Wednesday, 25 November 2015

My Current Shower Routine

Hi guys! It's been a while since I last did a product review as it's mostly been nail art since I got my mojo back, so I thought I would do a new shower routine as I am using new products I have not talked about before.


My first product isn't actually for in the shower but more of a prep. I am a person who showers in the evening, as I would rather go to bed feeling clean and have an extra few minutes in bed in the morning!
My boyfriend and I have the "should you shower in the morning or afternoon" debate quite a lot, as he loves to wake up and have a shower to wake him up. 
I have actually read somewhere that if you have drier skin like myself, then showering in the evening is better for you, and if you have more oily skin then showering in the morning is better for you as you tend to sweat more at night!

That seems to suit myself and Tom but who knows if its true or not!

Anyway! As I tend to shower in the evening I usually have makeup on so use my first product to remove all traces of make up before I cleanse.

Since some one stole my Ren Rose Balm (RIP) I don't have a face wash that removes makeup so I am currently using this 'Micellar Cleansing Water' by ' Sukin' which is an Australian natural skin care brand.


I had never heard of this brand before I came to Australia but it quite a large brand that can be found in Priceline stores which are the equivilent to Boots or Superdrug. They are a fairly new family owned brand which use completely natural ingredients! Yey! It has a large range from body and hair care, and they are really inexpensive too!
I love this cleansing water as it really cools my skin after the hot weather, and also removes all traces of my eye makeup without irritating my eyes.

This leads onto my next product which is also from Sukin, and is the first product I bought from the range.


I didn't actually realise until I looked more into the range that I bought the Derma Sukin wash which is for more problem skin, so this is probably not as simple as I need it to be, but nevertheless this hydrating face wash makes my skin feel really fresh, without that horrible dry feeling afterwards.
The consistency is like a very thin gel which I'm not usually a fan of, but in this case I don't mind it so much.

So next is onto hair care, and I have been using some more Australian natural products that are working wonders for me.

Organic Care is an amazing brand, dedicated to helping the environment as well as charities across the globe. They have lots of different cleaning products for the household as well as personal use to ensure we are using the best organic resources available.
They have lots of other hair ranges to tailor to different hair types, but I find this normal balancing shampoo and conditioner works perfectly for me.


The smell is so fresh and clean, and my hair has been the healthiest it has been ever! Again, this brand is so affordable! With the shampoo and conditioners each being about $3 in super markets!

The next product is one you may have seen on my Instagram a few weeks back. I have tried 'Original Source' shower gels before but never in this scent. The zesty lime and awakening mint are still up there as some good gels, but when I saw YouTuber and beauty enthusiast Shaaanxo feature this in a video I knew I wanted to try it.


I love the packaging and how it tells you a little fact about the ingredients that go into the shower gel and therefore coming straight from the 'Original Source' get it... see what they did there...kudos marketing team... good job.

The smell is incredible!! Like strawberry milkshake and I am obsessed with it! I honestly don't think I will use another shower gel ever again. AND Once again original source is a natural brand! and it is so cheap too! 


The next product is a fairly new idea on the showering market, as it is a body conditioner. As you would imagine, the idea is to condition you skin after washing like you would a normal hair conditioner.
I know Zoella made a video on a Lush one the other day, and expressed her opinion that anyone who says they enjoy moisturising their body is lying. And I completely agree! You just want to get on with your day and not have to wait 5 minutes to put on your clothes.
Cue the idea of an in shower body moisturiser. 


This Nivea one I have been using is made with Shea butter and has a really comforting smell. I use this after my shower gel (which is sometimes masks the milkshake smell :( ) but it does make my skin feel soft afterwards and I feel as if I've done a good deed for my body that day.

As I am living under the sun at the moment though, I do also use this Vaseline Aloe Vera moisturiser if I have been out in the sun as it is amazing at cooling any sun burn!


I love the fresh smell and even after some severe sun burns this has been my go to product as it is a miracle worker!

*

So there you have my new regime!
 As you can see my love for natural products has not gone anywhere, and I am pleased to say that my love hasn't been an expensive venture as I though it would have been to uphold. I didn't even mean to venture out and continue my love of natural products out here in Aus but it has just somehow managed to happen, and it's proven to me that it is not an expensive luxury after all!

Let me know if you have tried any of these or heard of them at all! I also want to hear about any other Australian products you think I should try so let me know!

Thursday, 29 October 2015

Graveyard Nails

Once again this year I haven't been able to get into the Halloween spirit quite as much as I wanted. As I am travelling my stocks of colours and equipment are pretty poor, so I have had to make do with what I have!
I did however make sure I had the time to do at least one nail art look for the holiday, as to my usual 3 or 4 options.

This year I went for slightly more sophisticated, (if Halloween can be sophisticated?!) and opted for an ombre silhouette graveyard scene. 


I started with a white base and then used a sponge to blend the blue and light purple colours to create a haunting sunset. I then went ahead with a black nail art pen to create jaunty tombstones and a tree.


I do actually think it's quite a pretty manicure, if you exclude the tombstones of course, but  now I have some sponges to do ombre nails I'm sure you can expect to see a lot more of those kinds of manicures.

If you want to take a look at some of my more creative and wacky nail art ideas, click here to see my Halloween posts I've done in the past.


Happy Halloween Y'all

Sunday, 27 September 2015

MDMBBFM Nails


I have no idea what to call these nails so I decided to take a leaf out of Rihanna's book and call them MDMBBFM, or Modern Day Monochrome Bad Bish French Manicure if you will.
 I do actually think they are the kind of nails Rihanna would wear, as they are a kind of rebellion on a manicure classic.

I have been really into the geometric, and monochrome style for nails at the moment, so expect to see some similar designs in the future. I am also loving the use of negative space, and think it looks really chic on a manicure, and it means your saving on buying a natural nail polish!

This was such a simple manicure but it has a really cool effect. I just painted the tips of my nails white, outlined the negative space in black and applied a top coat. As simple as that. I think this would look really cool on talon almond shaoe nails like Rihanna wears, to make the manicure look really sleek


Unfortunately my chubby little hands do the look no favours, but with long slender fingers and an abundance of midi rings and chunky jewelry, maybe even some henna, I think this would look amazing.

Monday, 14 September 2015

Koala Nails


I told you it wouldn't be long till I offended again, and with the embedded feeling that Mondays are for hashtagging manicures I simply couldn't spend my day off doing nothing, and so, these little Koala nails were born!

I was inspired to do these because of a small day trip I went on recently to a place called Lone Pine, which is a Koala sanctuary just outside of Brisbane. The place is full of kangeroos jumping around you, and there are other animals around too so it is like a small zoo.


However, Lone Pine holds the promise of being able to cuddle up and have your picture taken with a Koala which was an opportunity not to be missed!


For these nails, I used a neon yellow base which is particularly horrible on its own. It is by a brand simply called paint and is really cheap in the drug stores, only about $3 if that!
Next I used my grey L'Oreal polish for the little faces, and used my new nail art pens for detailing and the background palms.


My particular favourite nail is my thumb, I think his face came out the cutest!


Apologies for the crap quality of pictures, I will have to think of a way around this!
See you soon!